说明:前面两篇文章分别讲到:一是使用ollama本地部署deepseek以及局域网内访问,二个是对接本地ollama的API。完成私有化部署后,很多人喜欢用chatBoxAi、nextChat等工具来访问自己的AI,与之交互,我想很多人必定会有和我一样的想法:写一个自己的对话框。
今天主要讲的是自定义对话框,包括后端接口、前段页面。
一、编写后端接口
首先查看官方网站,定位api。
访问ollama的官方网站,
导航到api文档,
今天咱们对接到是比较简单的一个:
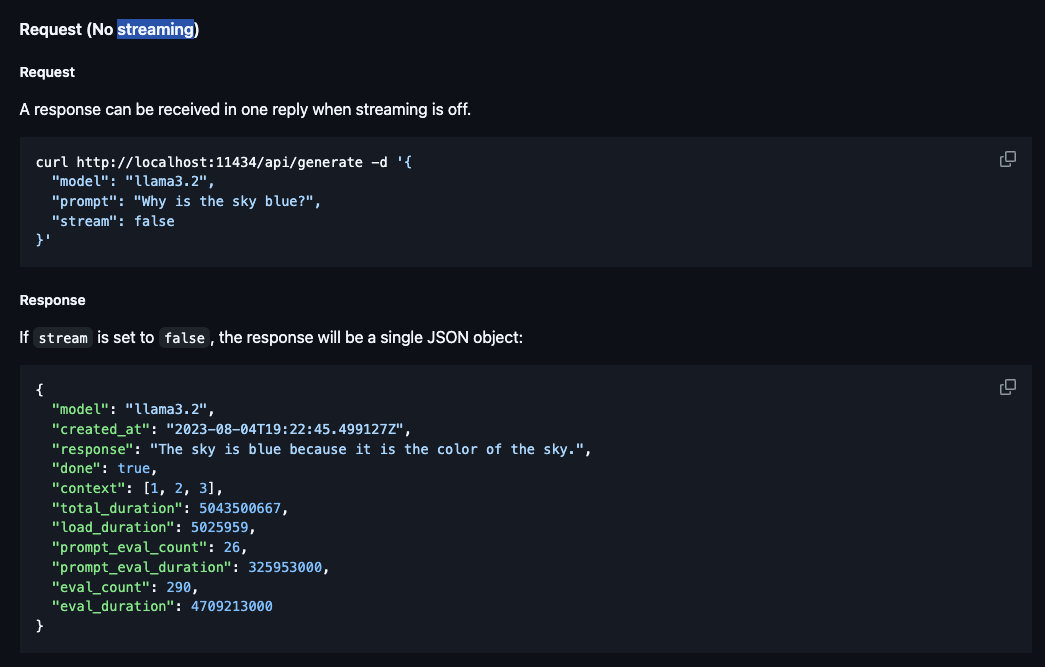
只不过stream = true
二、编写后端接口:
@ApiOperation(value = "stream-chat", notes = "stream-chat")
    @GetMapping(path = "/stream-chat", produces = MediaType.TEXT_EVENT_STREAM_VALUE)
    public Flux<String> streamChat(@RequestParam("prompt") String prompt) {
        log.info("发起对话,提示词:{}", prompt);
        WebClient client = WebClient.create("http://192.168.10.104:11434");

        Map<String, Object> params = new HashMap<>();
        params.put("prompt", prompt);
        params.put("stream", true);
        params.put("model", "deepseek-r1:7b");


        return client.post()
                .uri("/api/generate")
                .bodyValue(params)
                .retrieve()
                .bodyToFlux(String.class)
                .map(json -> parseOllamaResponse(json));
    }

    private String parseOllamaResponse(String json) {
        try {
            JsonNode node = new ObjectMapper().readTree(json);
            return node.path("response").asText().replace("\n", " "); // 清理换行符
        } catch (Exception e) {
            return "[解析错误]";
        }
    }
三、编写前段代码:
<template>
  <div class="chat-container">
    <!-- 消息展示区域 -->
    <div ref="messageBox" class="message-box">
      <div
        v-for="(msg, index) in messages"
        :key="index"
        :class="['message', msg.role]"
      >
        <div class="bubble">
          {{ msg.content }}
        </div>
      </div>
      <div v-if="loading" class="loading-indicator">
        <div class="dot-flashing"></div>
      </div>
    </div>

    <!-- 输入控制区域 -->
    <div class="input-area">
      <input
        v-model="inputText"
        @keyup.enter="startStream"
        placeholder="输入你的问题..."
        class="input-box"
      />
      <button @click="startStream" :disabled="isStreaming" class="send-button">
        {{ isStreaming ? "传输中..." : "发送" }}
      </button>
      <button v-if="isStreaming" @click="stopStream" class="cancel-button">
        停止
      </button>
    </div>
  </div>
</template>


<script>
export default {
  data() {
    return {
      messages: [], // 结构化消息存储
      inputText: "", // 绑定输入框
      isStreaming: false, // 传输状态
      loading: false, // 加载指示
    };
  },
  methods: {
    async startStream() {
      if (!this.inputText.trim()) return;

      this.isStreaming = true;
      this.loading = true;

      // 添加用户消息
      this.messages.push({
        role: "user",
        content: this.inputText,
      });

      try {
        const eventSource = new EventSource(
          `/api/v1/ollama/stream-chat?prompt=${encodeURIComponent(
            this.inputText
          )}`
        );
        let buffer = "";

        eventSource.onmessage = (e) => {
          buffer += e.data;
          // 流式更新最后一条消息
          if (this.messages[this.messages.length - 1].role === "assistant") {
            this.messages[this.messages.length - 1].content = buffer;
          } else {
            this.messages.push({
              role: "assistant",
              content: buffer,
            });
          }
          this.autoScroll();
        };

        eventSource.onerror = () => {
          eventSource.close();
          this.isStreaming = false;
          this.loading = false;
        };
      } catch (e) {
        console.error(e);
      }
    },
    autoScroll() {
      this.$nextTick(() => {
        const box = this.$refs.messageBox;
        box.scrollTop = box.scrollHeight + 20;
      });
    },
    stopStream() {
      if (this.eventSource) {
        this.eventSource.close();
        this.eventSource = null;
      }
    },
  },
};
</script>


<style>
.chat-container {
  max-width: 800px;
  margin: 20px auto;
  border-radius: 12px;
  box-shadow: 0 4px 16px rgba(0, 0, 0, 0.1);
  background: linear-gradient(145deg, #f8f9fa 0%, #e9ecef 100%);
}

.message-box {
  height: 60vh;
  overflow-y: auto;
  padding: 20px;
}

.message-box .message {
  margin: 12px 0;
}

.message-box .message.user {
  text-align: right;
}

.message-box .message.user .bubble {
  background: #007bff;
  color: white;
  border-radius: 15px 15px 0 15px;
}

.message-box .message.assistant .bubble {
  background: #ffffff;
  border: 1px solid #dee2e6;
  border-radius: 15px 15px 15px 0;
}

.message-box .message .bubble {
  display: inline-block;
  padding: 12px 18px;
  max-width: 70%;
  line-height: 1.5;
  box-shadow: 0 2px 4px rgba(0, 0, 0, 0.05);
}

.input-area {
  display: flex;
  gap: 10px;
  padding: 20px;
  background: rgba(255, 255, 255, 0.9);
  border-top: 1px solid #eee;
}

.input-area .input-box {
  flex: 1;
  padding: 12px;
  border: 2px solid #dee2e6;
  border-radius: 8px;
  transition: border-color 0.3s;
}

.input-area .input-box:focus {
  border-color: #007bff;
  outline: none;
}

.loading-indicator {
  padding: 10px 0;
  text-align: center;
}

.dot-flashing {
  position: relative;
  width: 10px;
  height: 10px;
  border-radius: 5px;
  background-color: #007bff;
  animation: dotFlashing 1s infinite linear;
}

.dot-flashing::before,
.dot-flashing::after {
  content: "";
  position: absolute;
  width: 10px;
  height: 10px;
  border-radius: 5px;
  background-color: #007bff;
  animation: dotFlashing 1s infinite linear;
}

.dot-flashing::before {
  left: -15px;
}

.dot-flashing::after {
  left: 15px;
}

@keyframes dotFlashing {
  0% {
    opacity: 0.2;
  }
  50% {
    opacity: 1;
  }
  100% {
    opacity: 0.2;
  }
}
</style>
说明:这里很多代码都是AI帮我写的,哈哈~~~
需要注意的是,本地测试的时候,配置好代理。
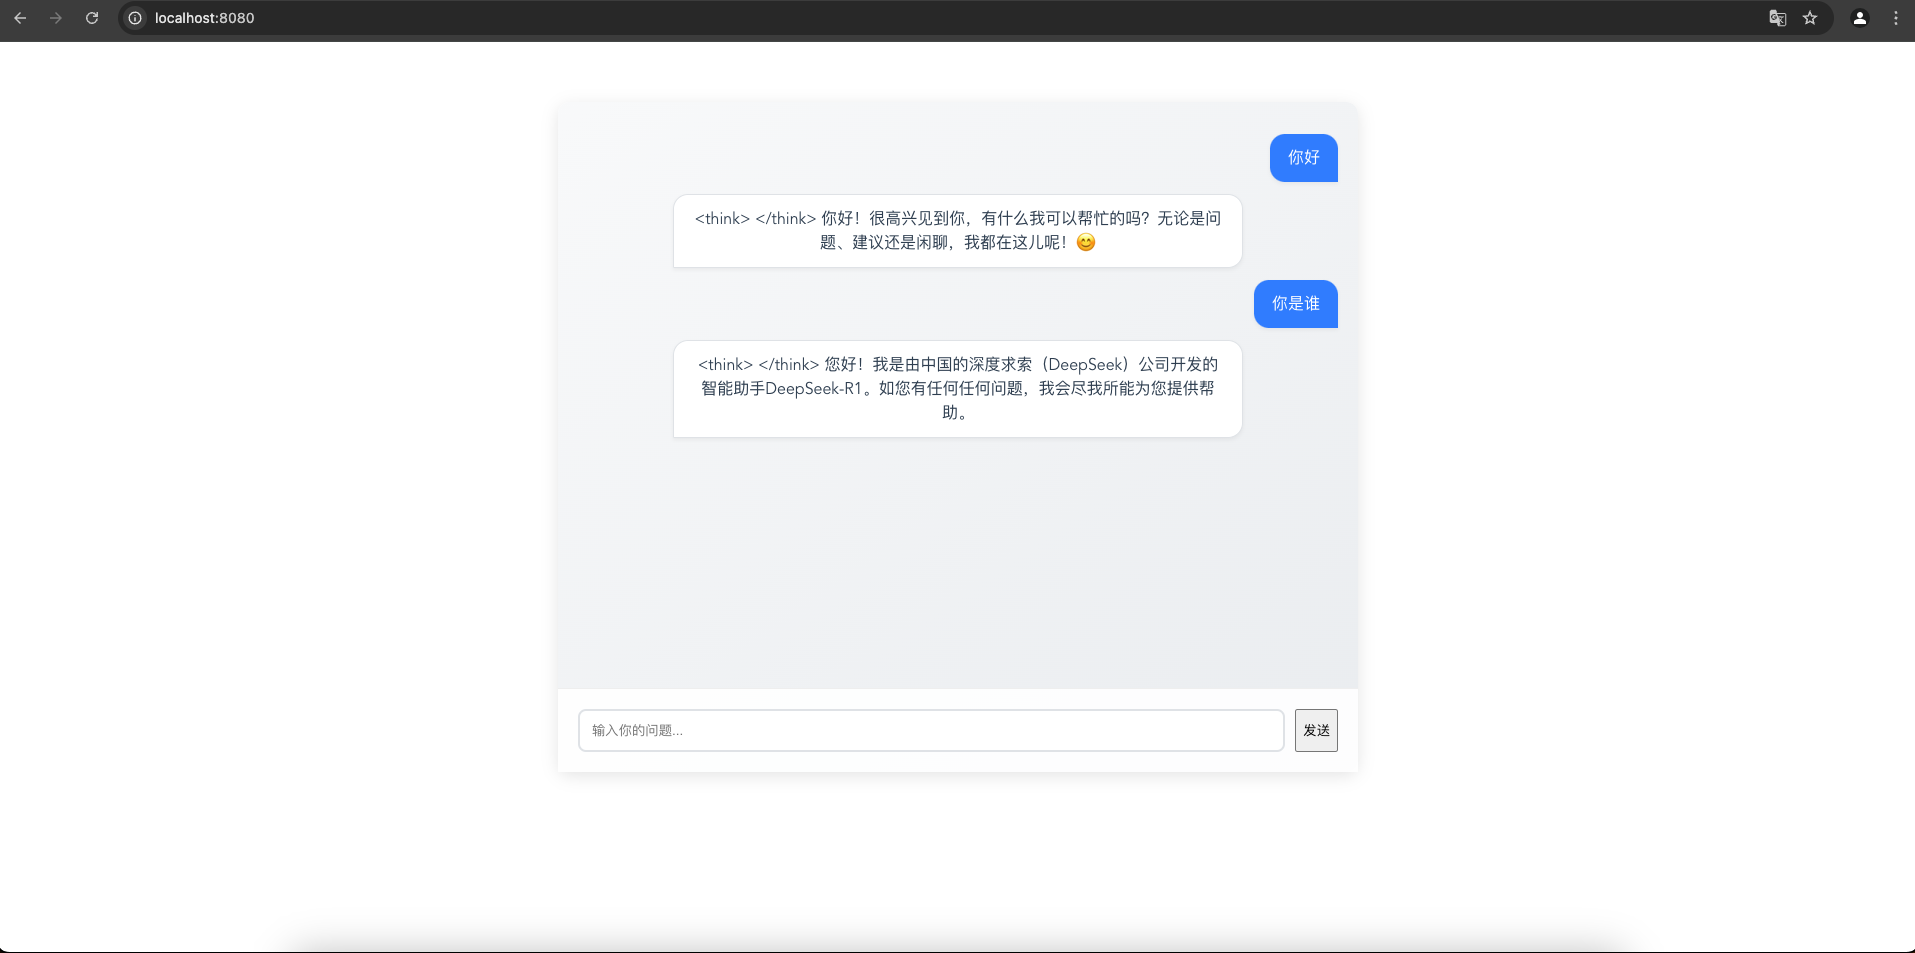
四、结果: